The Tool Bar |
| The tool bar control is a set of image buttons. A tool bar provides a quick and visual access to a set of functions in a program. The toolbar has a collection of buttons. The images in the toolbar come from an image list that is associated with the toolbar controls. In simple applications, an image list is required for the images in the button. In other cases, there must be two image lists, one is used when the button is enabled and another one is used when the button is disabled. Each button has a text, an image index and an ID. The text in the button provides information so that the user can understand what the button does. The image of the button provides graphic information so that the user can quickly understand what the button does. The ID is used to manage the event that will be produce when the user presses the button; most programmers use the convention that the command IDs begin with IDM_; where IDM means menu ID, because historically, some of the commands from the menu are also accessible from the toolbar. El control de barra de herramientas es un conjunto de botones con imágenes. Una barra de herramientas proporciona un rápido acceso visual a un conjunto de las funciones en un programa. La barra de herramientas tiene una colección de botones. Las imágenes en la barra de herramientas vienen de una lista de imágenes que está asociada al control de barra de herramientas. En aplicaciones simples, una lista de imágenes es necesaria para las imágenes en los botones. En otros casos, se tienen que tener dos listas de imágenes, una es usada para cuando el botón está habilitado y otra es usada cuando el botón está deshabilitado. Cada botón tiene un texto, un índice de la imagen y un identificador ID. El texto en el botón proporciona información de tal forma que el usuario puede entender que es lo que el botón hace. La imagen del botón proporciona información gráfica de tal forma que el usuario pueda en una forma rápida entender que es lo que hace el botón. El identificador ID es usado para administrar el evento que se generará cuando el usuario presione el botón, la mayoría de los programadores usan la convención de que los identificadores ID de comandos comiencen con IDM_; donde IDM significa identificador de menú, porque históricamente, algunos de los comandos del menú también pueden accesarse desde la barra de herramientas. |
| Problem 1 |
| Create a program called Admin with a toolbar. BE SURE to create a Dialog Application with toolbar icons. When the user clicks a button in the toolbar, the window title indicates the button that was pressed. Cree un programa llamado Admin con una barra de herramientas. Asegúrese de crear una Aplicación de Diálogo con iconos para la barra de herramientas. Cuando el usuario haga clic en un botón de la barra de herramientas, el título de la ventana indica el botón que fue presionado. |
| Step A |
| Create the project and use Wintempla to insert a Toolbar. Cree un proyecto y use Wintempla para insertar una barra de herramientas. |
| Step B |
| Open the Resource View to check what icons are already included with the projects. If the icons provided are not appropriate, you can create new icons. As the icon is a low resolution image, always use simple drawings to express the function of the icon. As the icon must combine with the background color, and as the background color may change, always designed your icons so that they can be noticed in any background. In high contrast situations, the borders of the icons can look bad; try using straight borders when possible. Abra la vista de recursos para verificar que iconos están ya incluidos con el proyecto. Si los iconos proporcionados no son apropiados, usted puede crear nuevos iconos. Como el icono es una imagen de baja resolución, siempre use dibujos simples para expresar la función del icono. Como el icono debe combinarse con el color de fondo, y como el color de fondo puede cambiar, siempre diseñe sus iconos de tal forma que puedan verse en cualquier fondo. En condiciones de alto contraste, los bordes de los iconos pueden verse mal; trate de usar bordes rectos cuando sea posible. |
| Step C |
| Use the right button of the mouse to open the context menu in the resource view to manage the ID as shown below. The resource symbol editor will open. You can use the editor to add, delete or edit any ID. In this case, we just verify that the symbols IDM_COPY and IDM_CUT are there. If you need to make a lot of changes in the symbols, you can edit the resource.h file manually. Use el botón derecho del ratón para abrir el menú de contexto en la vista de cursos para administrar los identificadores ID como se muestra debajo. El editor de símbolos de recursos ser abrirá. Usted puede usar el editor para agregar, borrar o editar cualquier ID. En este caso, nosotros solo verificamos que los símbolos IDM_COPY y IDM_CUT están ahí. Si usted necesita hacer muchos cambios en los símbolos, usted puede editar el archivo resource.h en forma manual. |
| Step D |
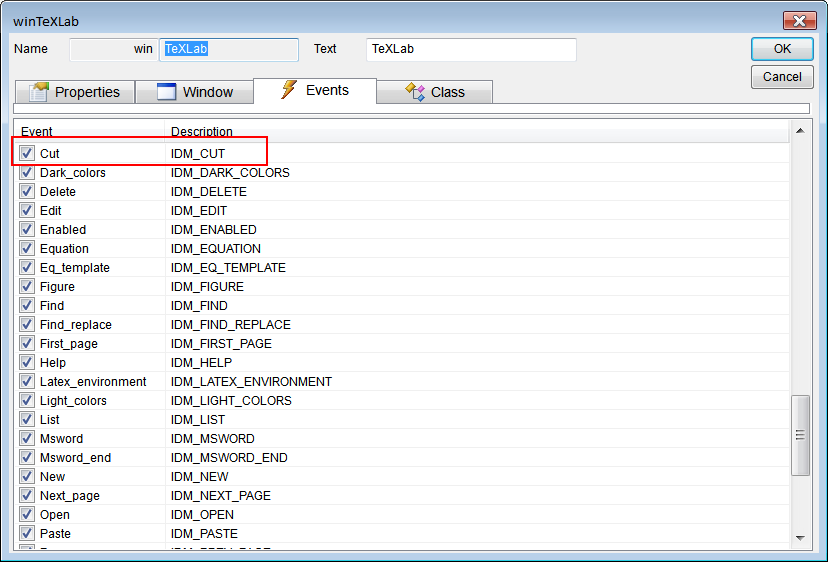
| Open Wintempla and double click anywhere outside the toolbar. Go to the Events tab and mark IDM_COPY and IDM_CUT. Close Wintempla by using the OK button. Abra Wintempla y haga doble clic en cualquier lugar fuera de la barra de herramientas. Cámbiese a la pestaña de Events y marque IDM_COPY y IDM_CUT. Cierre Wintempla usando el botón de OK. |
| Admin.cpp |
| void Admin::Window_Open(Win::Event& e) { //________________________________________________________ toolb1 TBBUTTON tbButton[3]; toolb1.imageList.Create(20, 20, 2); toolb1.imageList.AddIcon(this->hInstance, IDI_COPY); toolb1.imageList.AddIcon(this->hInstance, IDI_CUT); toolb1.SendMessage(TB_BUTTONSTRUCTSIZE, (WPARAM)(int)sizeof(TBBUTTON), 0); toolb1.SetImageList(toolb1.imageList); //_____________________________________ tbButton[0].iBitmap=MAKELONG(0, 0); tbButton[0].idCommand=IDM_COPY; tbButton[0].fsState=TBSTATE_ENABLED; // | TBSTATE_WRAP tbButton[0].fsStyle=BTNS_BUTTON; tbButton[0].dwData=0L; tbButton[0].iString= (LONG_PTR)L"Copy"; //________________________ A separator tbButton[1].iBitmap=-1; tbButton[1].idCommand=0; tbButton[1].fsState=TBSTATE_ENABLED; // | TBSTATE_WRAP tbButton[1].fsStyle=BTNS_SEP; tbButton[1].dwData=0L; tbButton[1].iString=0; //_____________________________________ tbButton[2].iBitmap=MAKELONG(1, 0); tbButton[2].idCommand=IDM_CUT; tbButton[2].fsState=TBSTATE_ENABLED; // | TBSTATE_WRAP tbButton[2].fsStyle=BTNS_BUTTON; tbButton[2].dwData=0L; tbButton[2].iString= (LONG_PTR)L"Cut"; toolb1.SetBitmapSize(20, 20); toolb1.SetButtonSize(24, 22); toolb1.AddButtons(tbButton, 3);//includes the separator toolb1.SendMessage(TB_AUTOSIZE, 0, 0); toolb1.SetMaxTextRows(1); toolb1.Show(SW_SHOWNORMAL); } void Admin::Cmd_Copy(Win::Event& e) { this->Text = L"Copy"; } void Admin::Cmd_Cut(Win::Event& e) { this->Text = L"Cut"; } |
Vertical Toolbar |
| A toolbar can be vertical by using TBSTATE_WRAP in the fsState of each button. A vertical toolbar cannot have separators. Una barra de herramientas puede ser vertical usando TBSTATE_WRAP en el fsState de cada botón. Una barra de herramientas vertical no puede tener separadores. |
| Program.cpp |
| //_____________________________________ tbButton[6].iBitmap = MAKELONG(6, 0); //<< IMAGE INDEX tbButton[6].idCommand = IDM_MSEXCEL; tbButton[6].fsState = TBSTATE_ENABLED | TBSTATE_WRAP; tbButton[6].fsStyle = BTNS_BUTTON; tbButton[6].dwData = 0L; tbButton[6].iString = (LONG_PTR)L"Export to Microsoft Excel"; |
A Rectangular Toolbar |
| A horizontal toolbar can have several rows of buttons. A rectangular toolbar is built in the same way as a regular toolbar; you must use the TBSTATE_WRAP state in the last button of each row to wrap the buttons to the next row in the toolbar. Una barra de herramientas horizontal puede tener varios renglones de botones. Una barra de herramientas rectangular se construye en la misma forma que una barra de herramientas regular; usted debe usar el state TBSTATE_WRAP en el último botón de cada renglón para pasar los botones al siguiente renglón de la barra de herramientas. |
Accelerators |
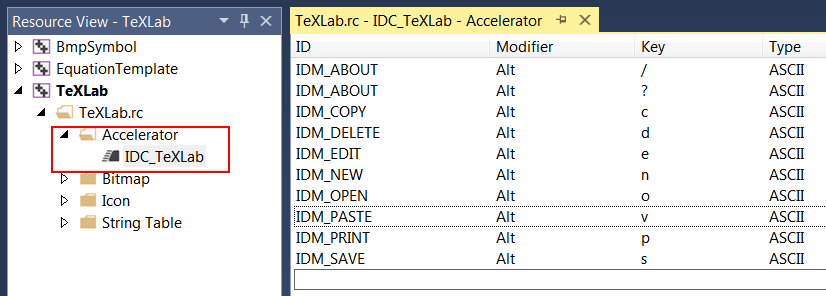
| It is possible to use key combinations in the computer keyboard to execute commands without using the mouse. These key combinations are called Accelerators and can be used only in Windows Applications; accelerators do not work on Dialog Applications. Accelerators are setup in the Resource View as shown below. You may click in the last row of the accelerators list to add a new accelerator. You may click on any column to edit an existing accelerator. Es posible usar combinaciones de teclas en el teclado de la computadora para ejecutar comandos sin usar el ratón. Estas combinaciones de teclas son llamadas Aceleradores y pueden ser usados solamente en Aplicaciones de Ventana; los aceleradores no funcionan en aplicaciones de diálogo. Los Aceleradores son configurados en la Vista de Recursos como se muestra debajo. Usted puede hacer clic en el último renglón de la lista de aceleradores para agregar un nuevo acelerador. Usted puede hacer clic en cualquier columna para editar un acelerador existente. |

| Tip |
| The ID of accelerator command must begin with IDM_ so that it can be used as a command. For instance, if you have IDM_CUT, you must have an event Window call Cmd_Cut(Win::Event& e), as shown below, that can be called from a Toolbar or from an accelerator if IDM_CUT is included in the list of accelerators. El ID del comando del acelerador debe comenzar con IDM_ de tal forma que pueda ser usado como comando. Por ejemplo, si usted tiene IDM_CUT, usted debe tener un evento de Ventalla llamado Cmd_Cut(Win::Event& e), como se muestra debajo, que puede ser llamado desde una barra de herramientas o desde un acelerador si IDM_CUT está incluido en la lista de aceleradores. |
| Tip |
| Any resource (including Accelerators) are defined in the Resource.h file and the MyProgram.rc file. Both files are text files that can be edited manually. The table below shows some examples of accelerators. "^C", IDM_COPY ; Control+C "K", IDM_INSERT ; Shift+k "e", IDM_EDIT, ALT ; ALT e "p", IDM_PLOT ; p "G", IDM_CLEAN ; G VK_F1, IDM_ZOOM, VIRTKEY ; F1 VK_F1, IDM_SUM, CONTROL, VIRTKEY ; Control+F1 VK_F1, IDM_NEXT, SHIFT, VIRTKEY ; Shift+F1 VK_UP, IDM_PREV, ALT, VIRTKEY ; Alt+Up VK_F2, IDM_VIEW, ALT, SHIFT, VIRTKEY ; Alt+Shift+F2 VK_F2, IDM_PLAY, CONTROL, SHIFT, VIRTKEY ; Control+Shift+F2 VK_F2, IDM_STOP, ALT, CONTROL, VIRTKEY ; Alt+Control+F2 Cualquier recurso (incluyendo los Aceleradores) están definidos en los archivos Resource.h y MyProgram.rc. Ambos archivos son archivos de texto que pueden ser editados manualmente. La tabla de abajo muestra algunos ejemplos de aceleradores |